How to DIY a table riser, with Lauren 🪓
For most, getting your home ready for Thanksgiving is easier said than done. Not for Lauren (@laurenshandmadehome) 🦃
Meet Lauren, a wife, mother and DIY’er, on a quest to get her home ready for Thanksgiving. She recently handmade a wooden dining table riser as her Thanksgiving centerpiece. Here, we speak to Lauren about her home in Atlanta, Georgia, and how she prepares for Thanksgiving, including the step-by-step process of how she DIY'd her wooden table riser.Buying the house 🏡
“We bought our home 7 years ago from a family who had lived here for 27 years. They hadn’t changed a single thing since it was built, so we knew going in that we had a lot of work on our hands to make it feel like 'us'.But we were drawn to the wood burning fireplace, natural stone, built-ins and moulding. I knew right away this house had all the potential in the world. I’m glad my husband trusted me on that, because we definitely had family members who had doubts about this place.”How-to: DIY a table riser 🔧
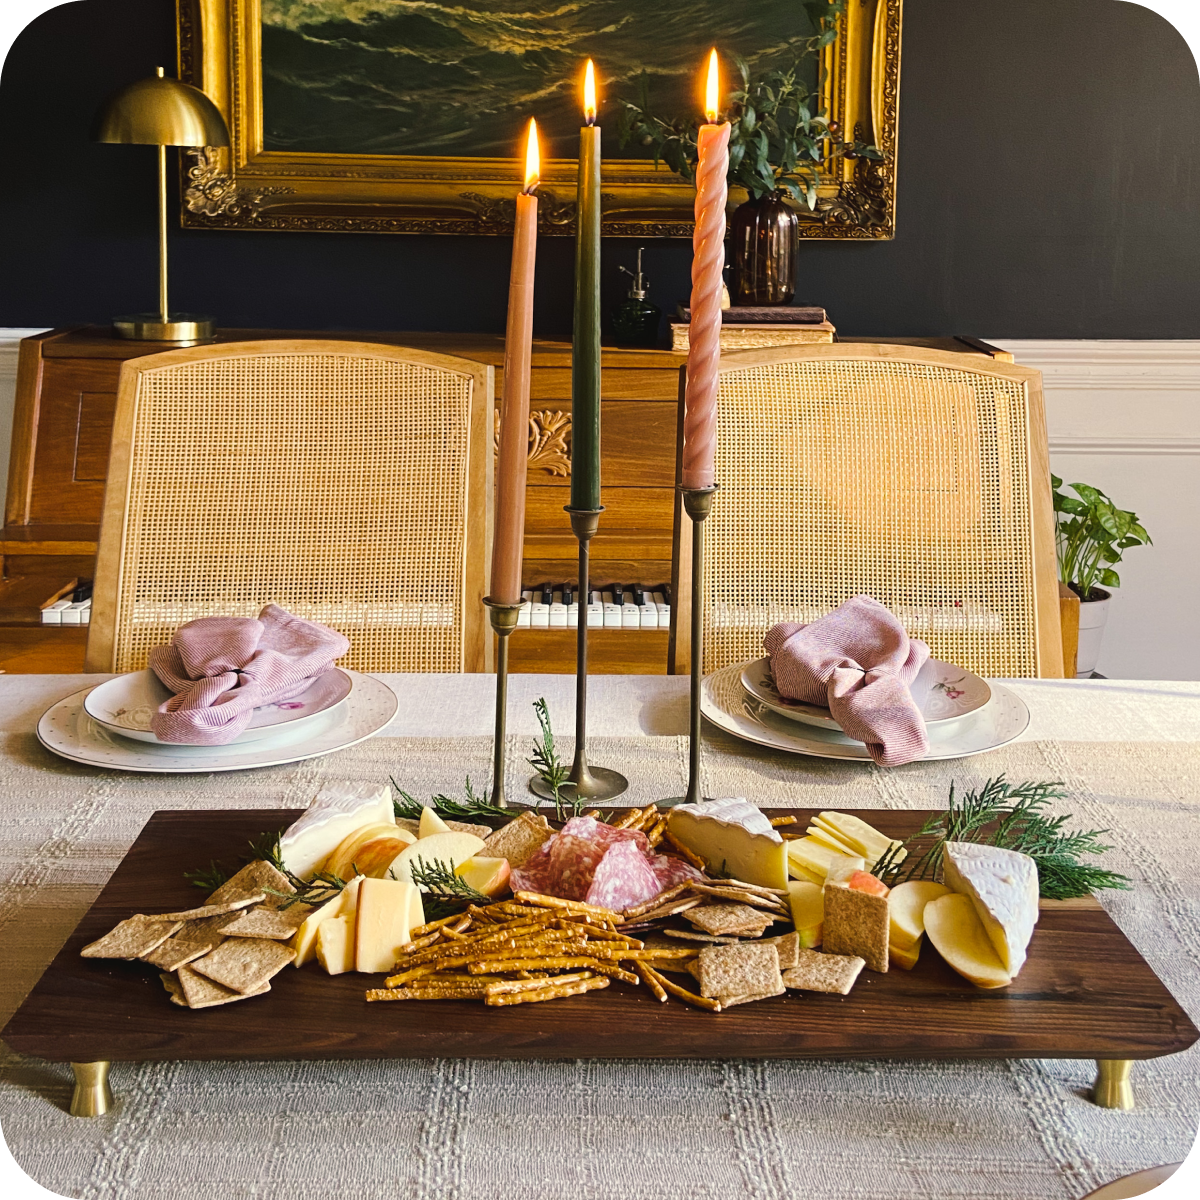
“I’ve seen dining table risers becoming popular in the last couple years, and I love how they can corral objects into a vignette. But most of the risers I see don’t suit my vintage style. So I took matters into my own hands! This project is great because you really don’t have to build your own board first. You can use any charcuterie board! Though, I did choose to start from scratch:
The walnut board before adding the finishing touches ✨
The walnut board
I went to a local lumber yard to find my walnut board. In my area, big box stores don’t carry walnut timber, and I knew I wanted that gorgeous graining and natural color!I used my miter saw to cut my board in half, then glued the two pieces together with wood glue and clamps.To get my board as flat as possible, I clamped the board on both sides as well as clamping it to a flat surface underneath (a piece of plywood, in my case). Make sure to remove as much excess glue as you can to save yourself some time sanding!Next I took my board to my table saw and all 4 edges at a 45 degree angle to give the look more interest.Now with any woodworking project, you do have to sand. I started at 80 grit and worked through 120, 150, 220, then 320 to make my board buttery smooth. My orbital sander made this much faster, but it can definitely be done by hand.My next step was oiling the board with mineral oil, which is food safe and inexpensive. This was so satisfying, as it brought up that natural walnut color and grain instantly! I rubbed it in with a soft cloth, then waited two hours between coats. I did a total of three coats.All of the previous steps can be skipped if you want to use a charcuterie board you already have or one you have purchased!

Lauren superglued our STACK Knobs to her walnut board 🌟
An elegant finishing touch
“I picked the STACK knobs for their perfect blend of traditional and modern. I knew the brass would pop against the walnut! When they arrived I was very impressed with their weight and quality. I work with a lot of hardware, and these immediately felt luxe. Their modern shape helped the wooden table riser look elegant, rather than rustic. Rustic has its place! It just wasn’t what I was going for here.”How to add the feet
I allowed the walnut board to cure overnight before I added my gorgeous STACK knobs as feet. I didn’t want the oil to interfere with the adhesion.To add the knobs, I simply used super glue! I then let it set for about an hour before putting my new table riser to use.”

Our STACK knobs give the table riser a helpful boost, resulting in the ultimate tablescape 😲
5 steps to get your home Thanksgiving-ready 🦃
"1. Clean! There’s nothing more overwhelming as a host than having your home a mess. 2. Add fall touches to get the whole household in the spirit ahead of time.3. Prep as much of your thanksgiving feast ahead of time as you can. I make pies and dough for the rolls the day before, start thawing the turkey 4 days ahead, and use my crockpot to start the mashed potatoes first thing in the morning. 4. Set your table the day before! I like to use my grandmother's Chinaware as a touch of nostalgia. And I always prefer a simple, low centerpiece so I can enjoy conversation across the table easily. 5. Take some time to take care of yourself in the week before. Thanksgiving is a lot of work, and it’s easier to handle the overwhelm if you’ve had some downtime in advance."DIY: A mother’s downtime 😌
“I started DIY’ing to save money. But as I’ve taken on more and more, it’s become my saving grace. I have been extremely blessed to be a stay at home mother. It’s easy to lose your own goals and lose sight of what you need in the chaos of bringing up tiny humans. My DIY projects are my “me” time, and they remind me who I am aside from being a wife and a mother.”Like-minded creators 🛠
“I started following @chrislovesjulia and @ispydiy years ago, and immediately their styles resonated with me. I love Julia’s modern traditional style, and Jenni’s thrifted spaces are incredible. I can’t pick 3 favorites for DIY inspiration, as there are dozens that inspire me! But off the top of my head:”Cass of @cassmakeshome
Van of @percivalinbloom
Brie of @briebuilds
Audiobooks FTW 📚
"I actually listen to audiobooks while I work! I’m currently on Book 5 in the Wheel of Time. Having a good book helps me stay focused, where switching from song to song can be distracting for me. I end up scrolling through my music instead of working!"Thanks to Lauren for joining us for a TEA BREAK ☕ Why not support her DIY projects over at @laurenshandmadehome?
Blog


Fit for pro skills…