Upcycling Ideas For Front Doors
First impressions count and your front door should invite guests into your home. But could yours desperately do with an upgrade? Like everything in the home, front doors have their own lifespan and can be worn down by years of shutting, slamming and the occasional kick. 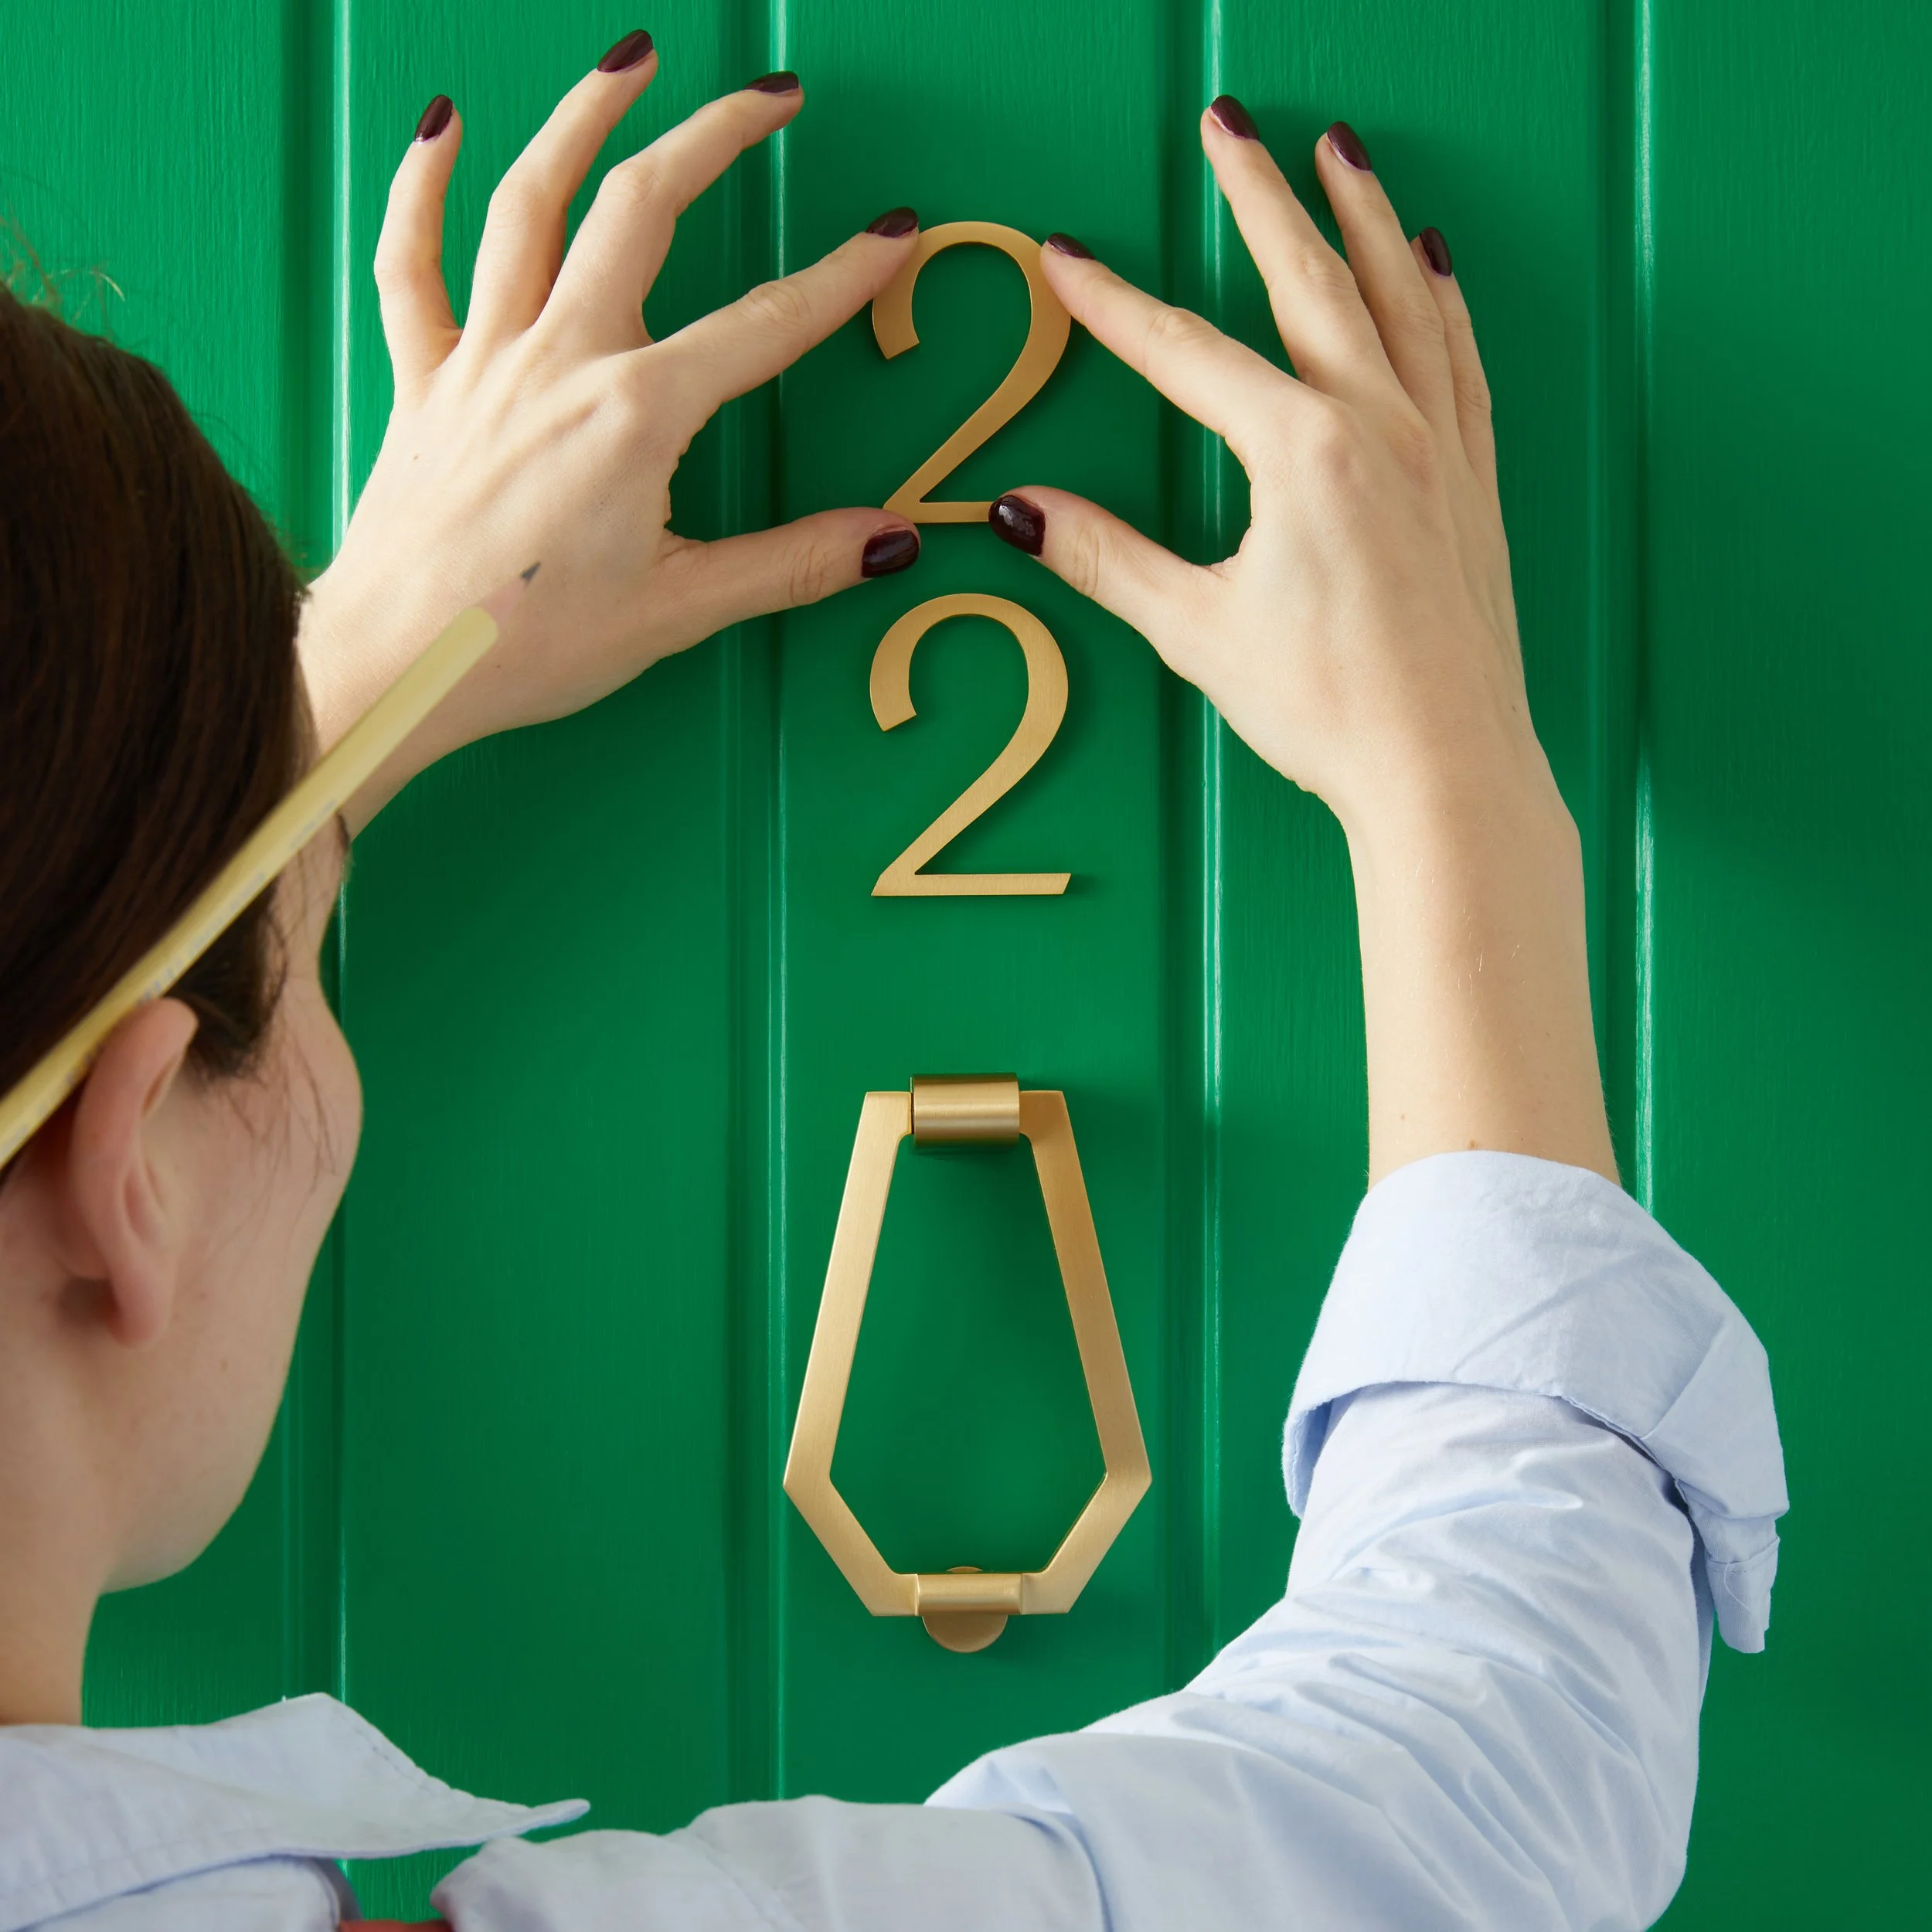
Upgrade your home entrance with solid brass details
As well as the risk of the door’s movement becoming restricted, another threat is the good old British weather. Specifically, the moisture caused by rain and damp environments ☔ When combined with heat and sunlight, this can cause the wood to expand over time and become misshapen, leading to security risks, draughts and poor glazing 😬You can avoid all of this and don’t have to shell out on a brand new front door either. With our old doors ideas, we’re encouraging you to reuse old doors and upcycle them into ones you’d swoon over on Pinterest. No trip to the tip necessary. It can all be achieved with a modest budget, a few tools and our expert guidance. From reviving your door with a lick of paint to updating the hinges, handles and adding a decorative knocker, continue reading to discover a range of ways to use front doors 👇Add A Fresh Coat
Front doors need some TLC every three to five years. Needless to say, you’d rack up quite the cost if you replaced your door every time you noticed an imperfection like flaking paint or faded colours. Then there’s the time you’d have to spend sourcing the right door and fitting it – no thanks. Instead, repainting is the budget-friendly way to give your front door a makeover and you can do it in just a few days.Some inspiration before you start painting
If you’re on the hunt for front door ideas and designs, we’re helping you put your own stamp on your home. For modern houses, bright and bold colours like yellow, turquoise and orange add a real wow-factor 🙌 Classic monochrome works a treat for period properties, while pastel shades look beautiful on countryside cottages and houses by the sea. If you prefer understated elegance, darker shades of blues, plum and green are great for making a subtle style statement.How to prepare your front door for painting
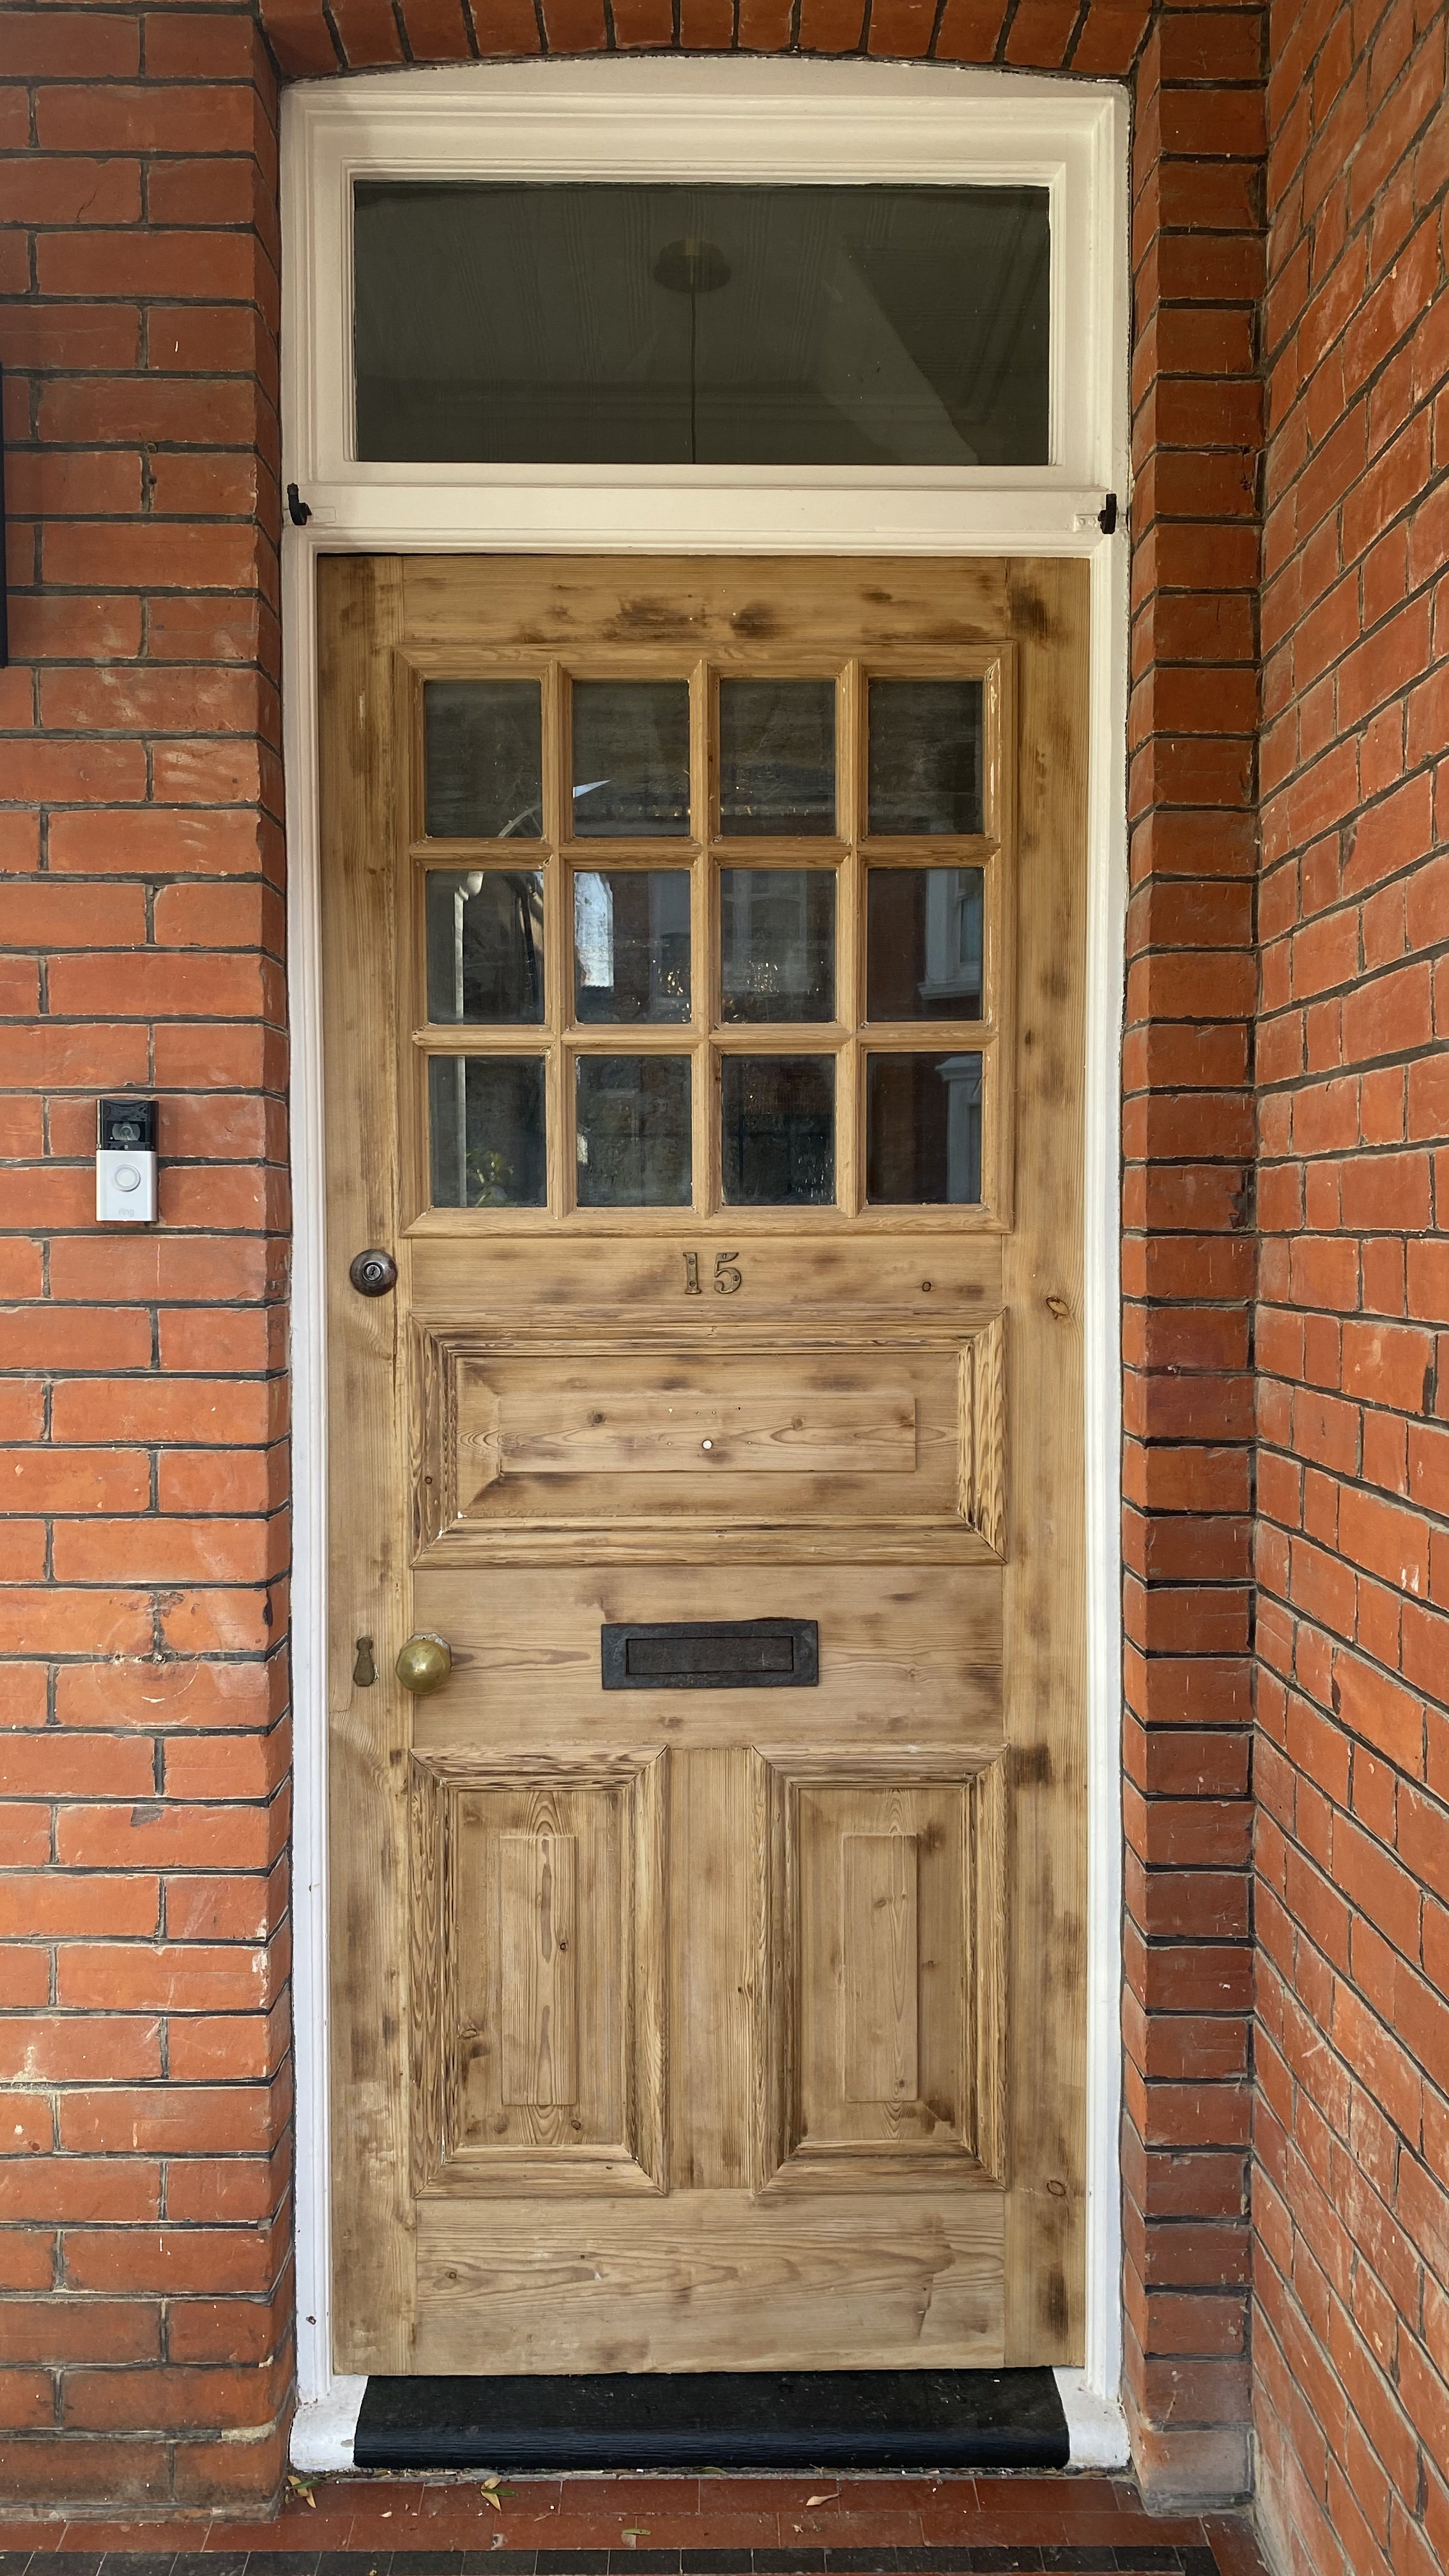
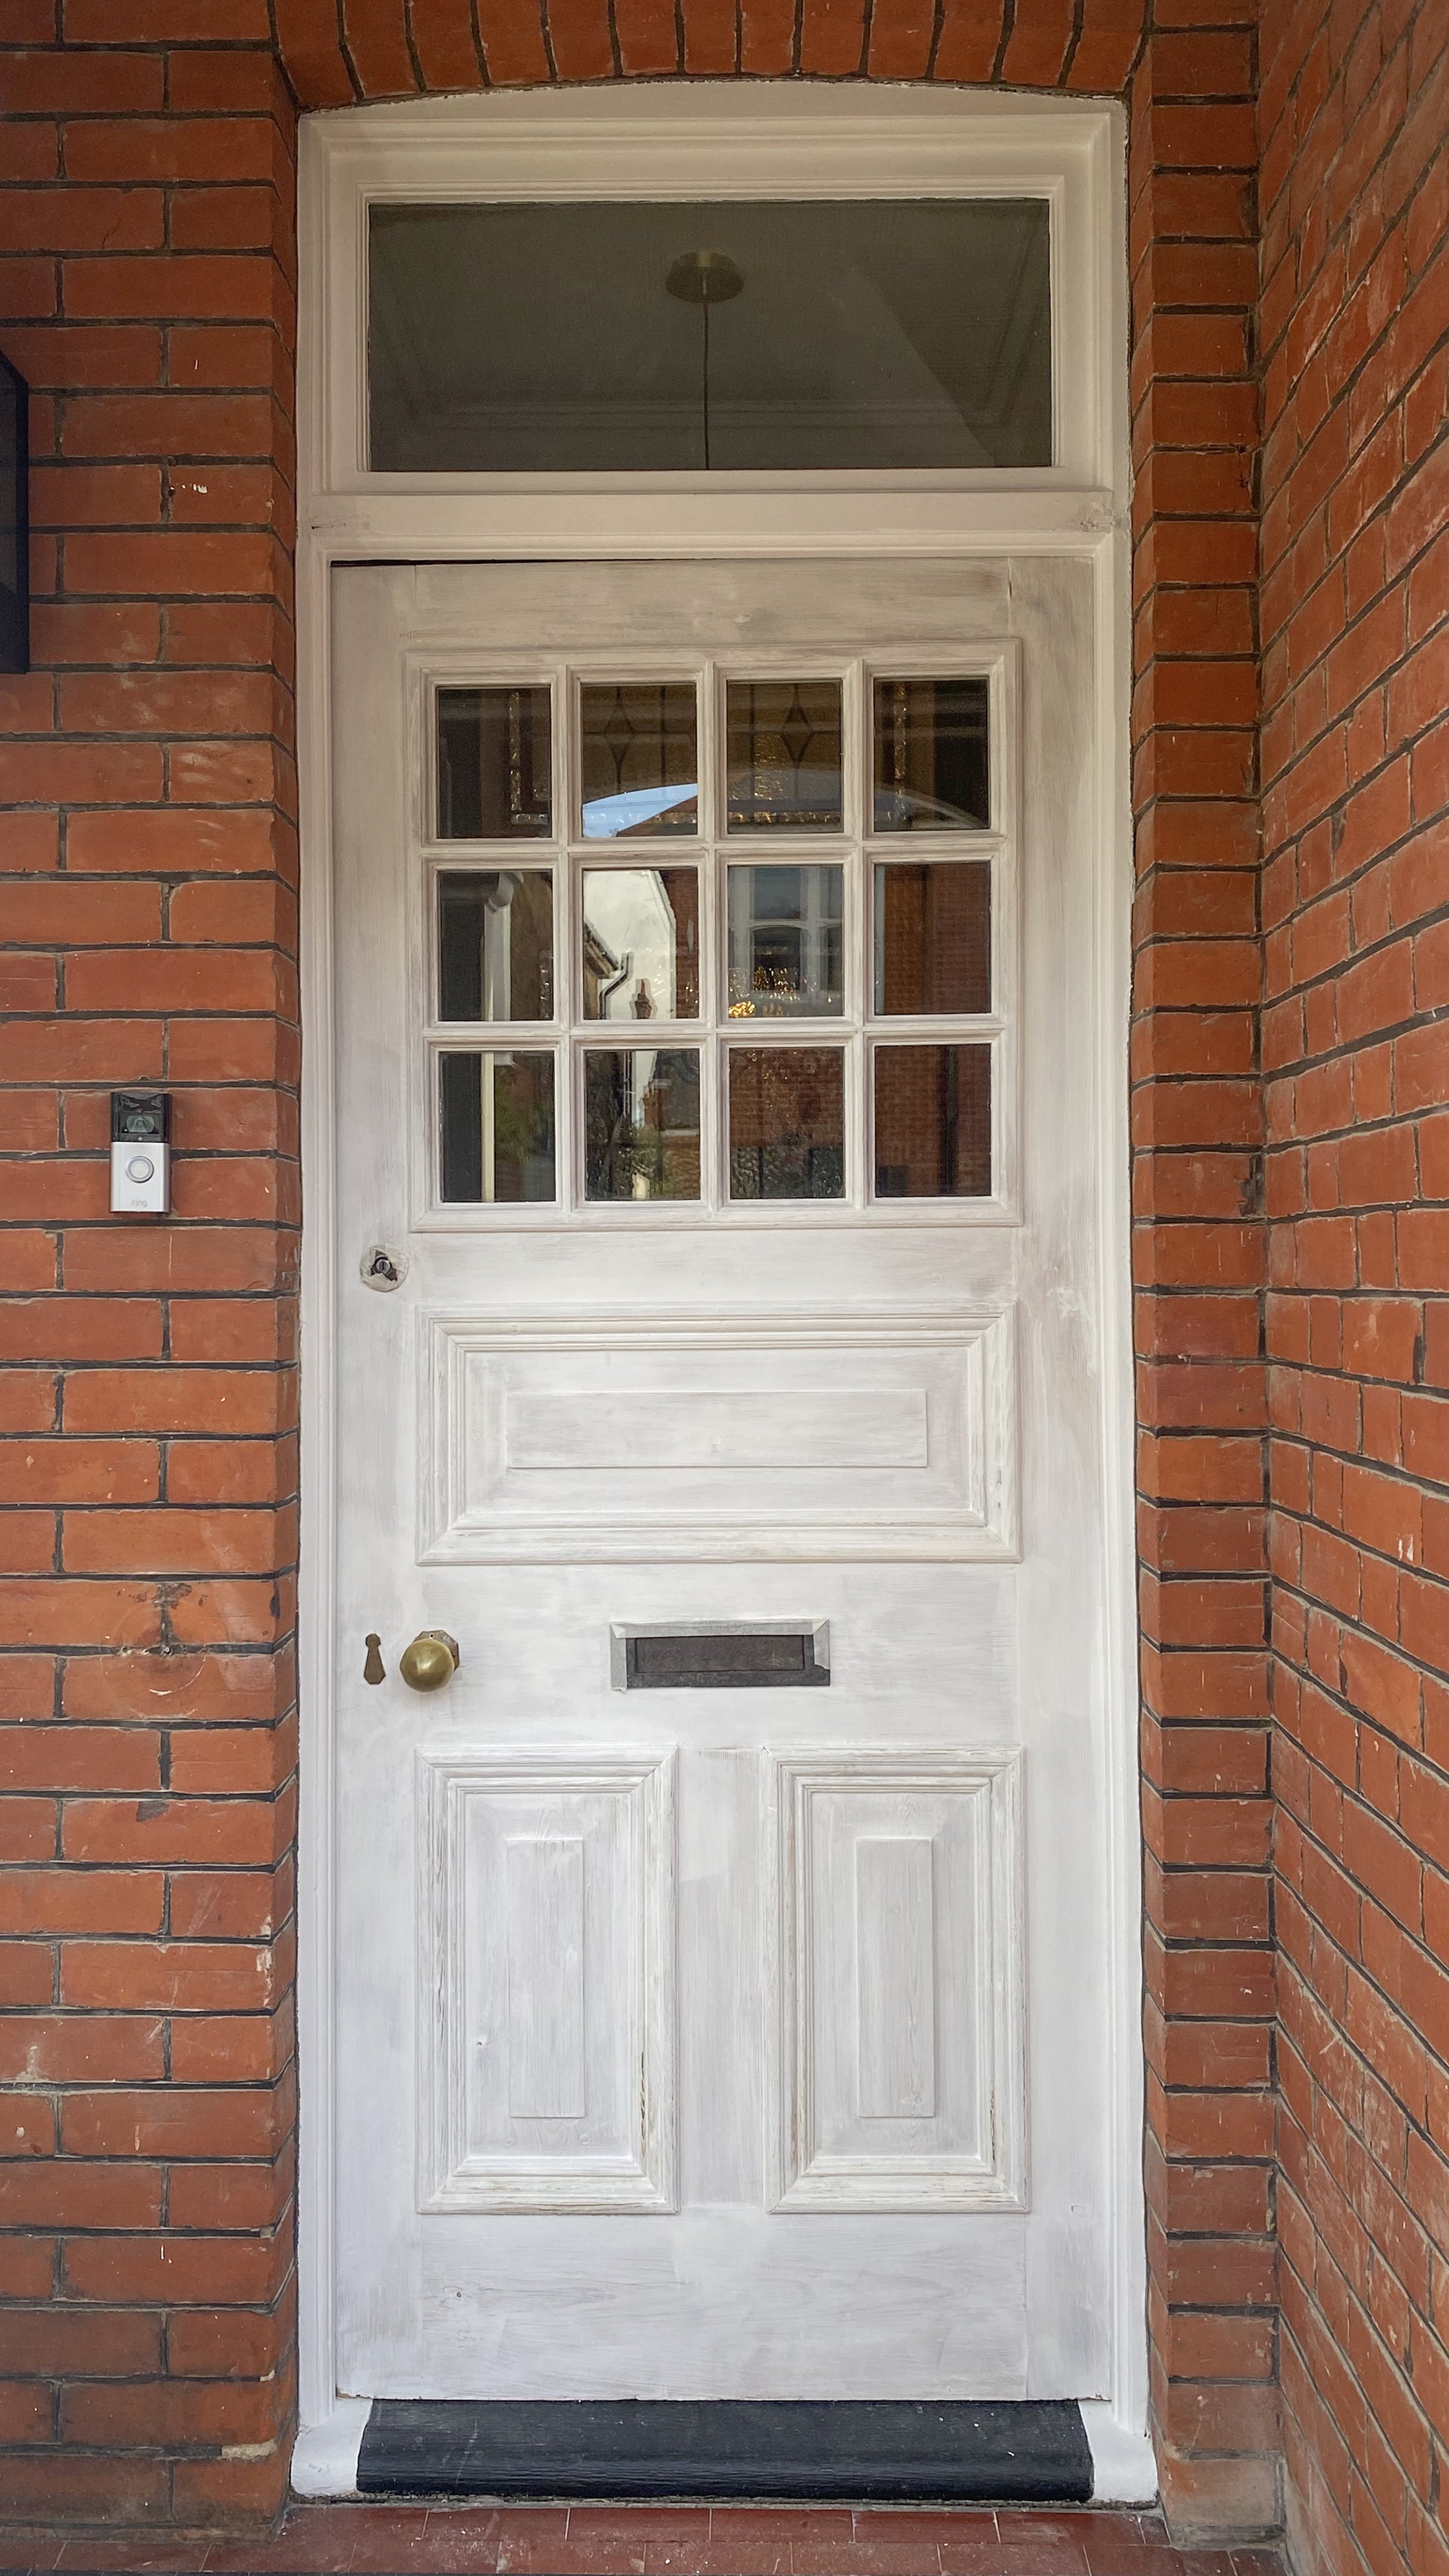
By now you’ll know that the best DIY starts with proper prep, which is why we’ve broken down what’s involved before you paint your front door. You can see the steps for yourself in Jasmin’s (@brickdustbaby) transformation reel, where she gave her original Edwardian front door a 21st century facelift.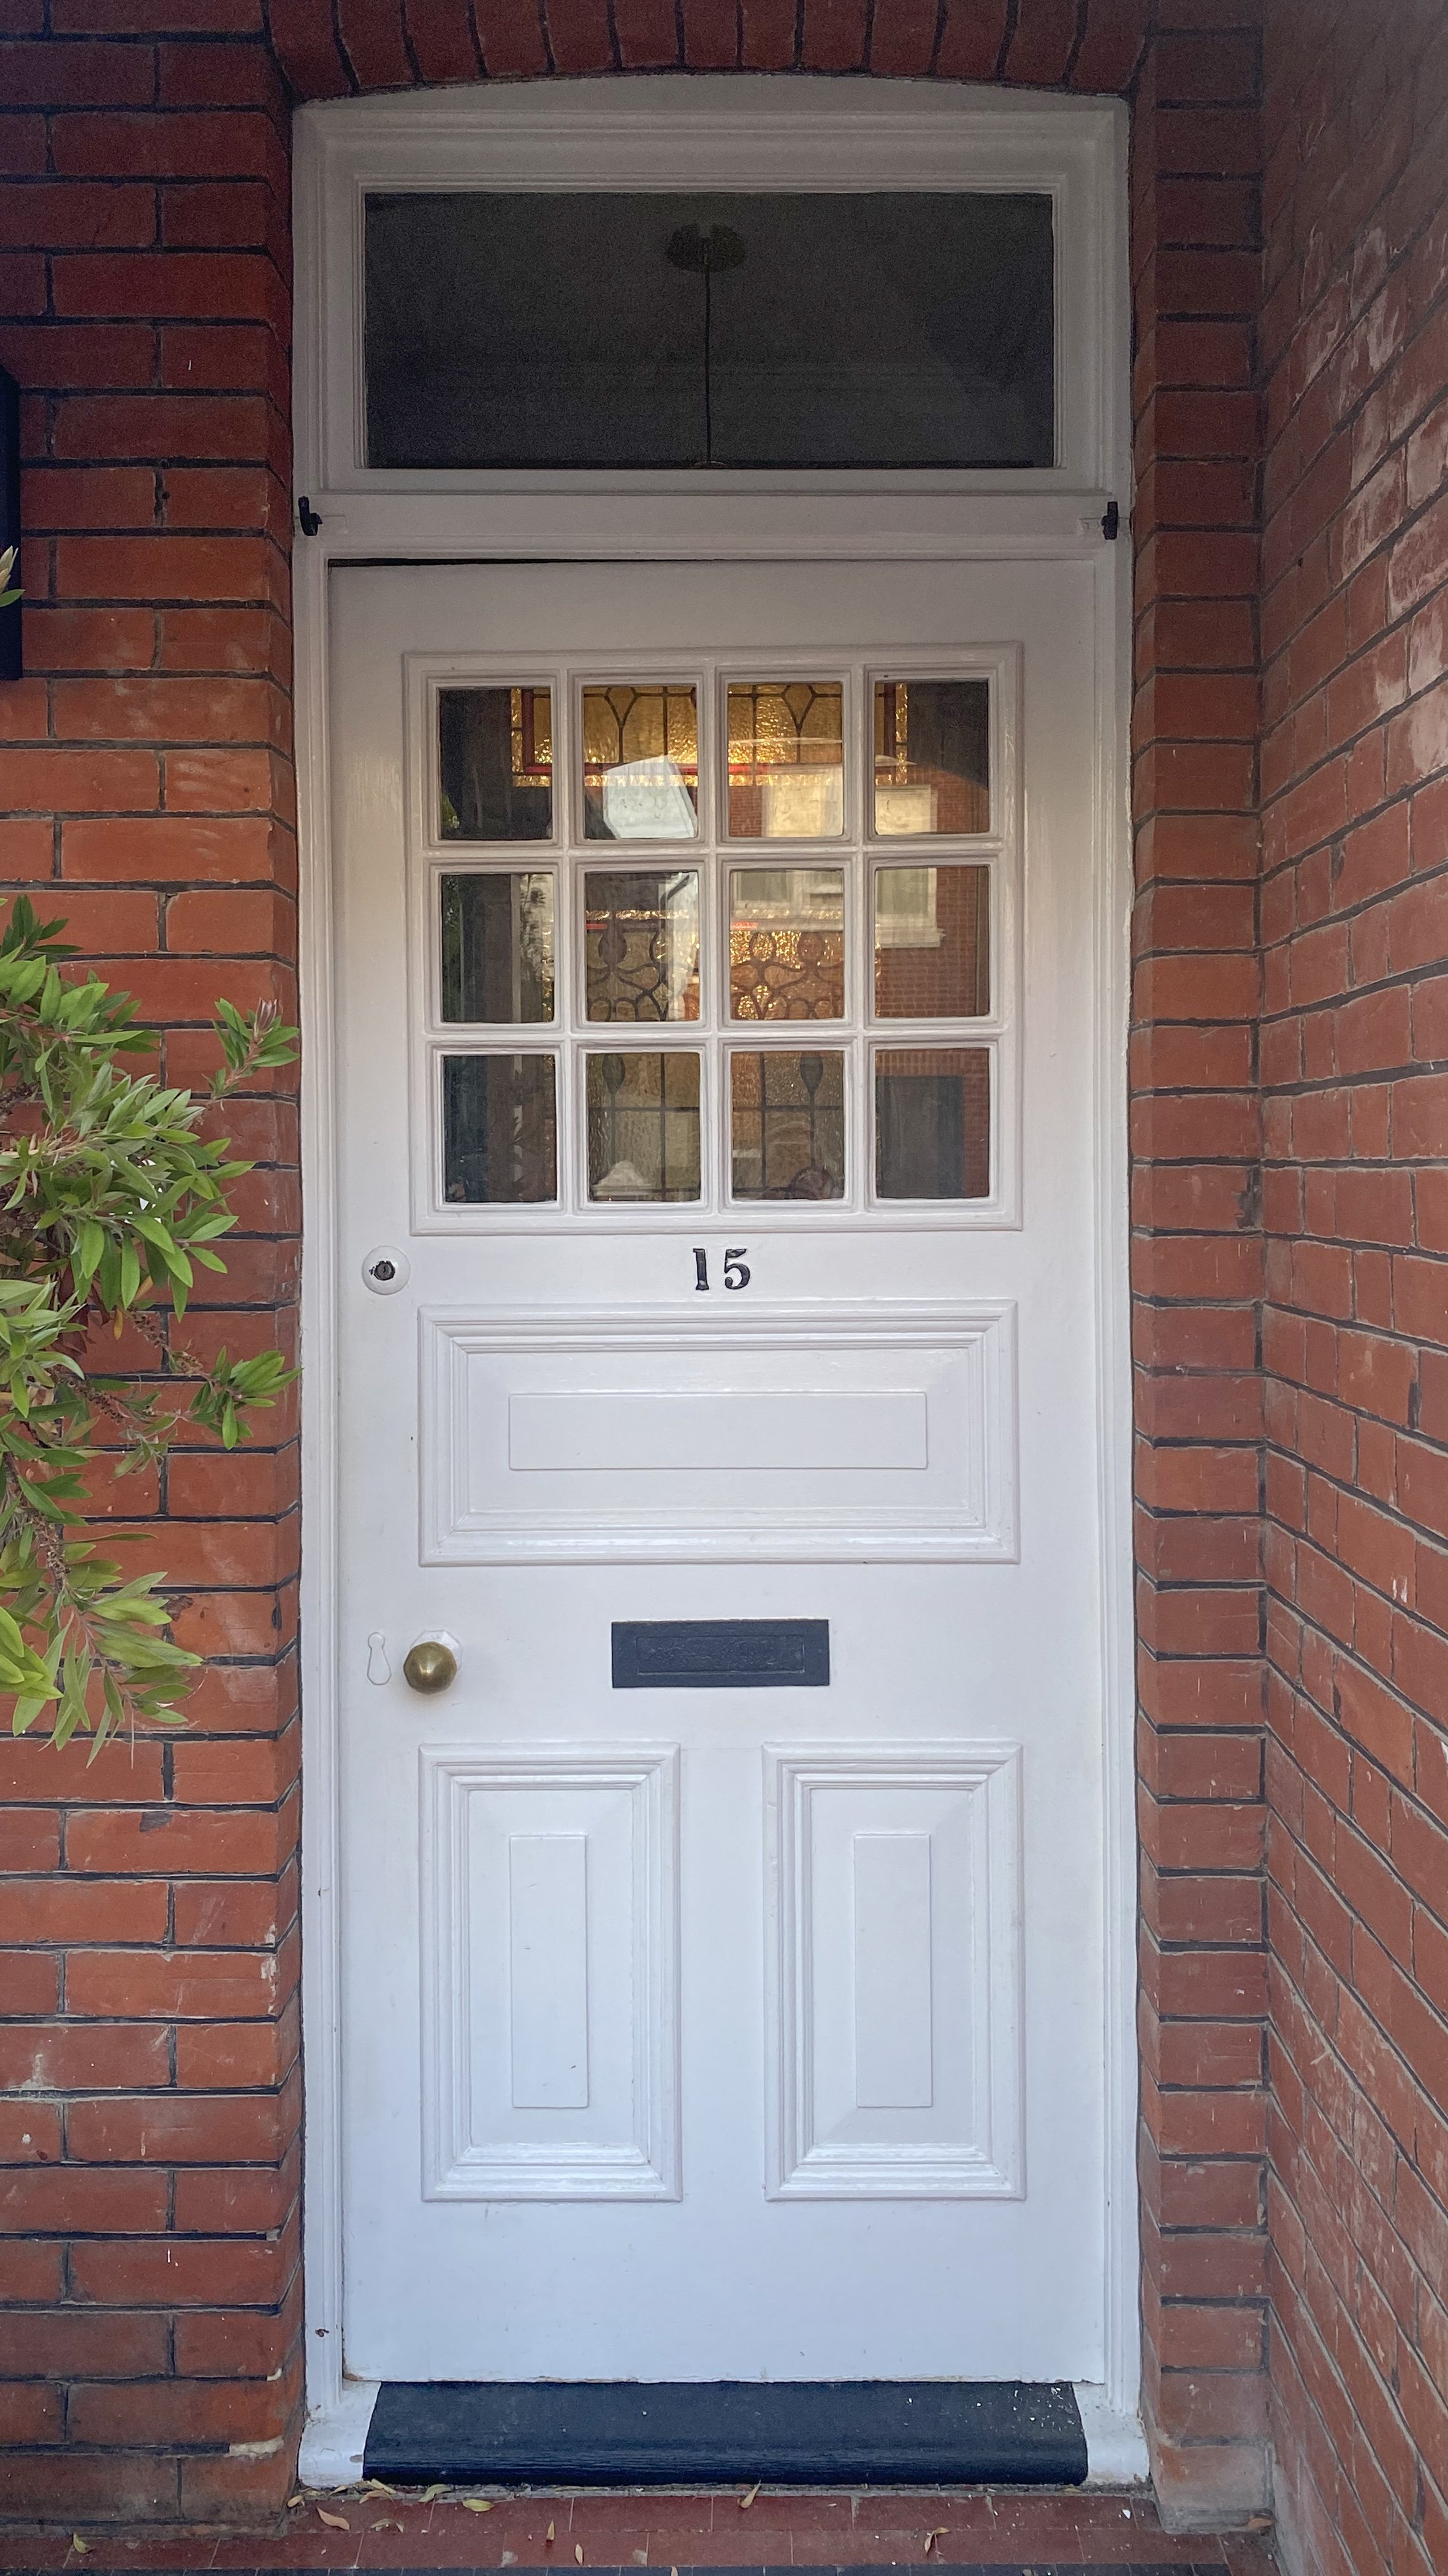

Sand off the existing top coat of paint
This applies not only to wooden doors, but to UPVC and composite ones as they have a glossy surface that makes it harder for the paint to stick to. Go over the door with medium grade sandpaper before going over with fine grade. You’re best off doing this by hand, as an electric sander has enough power to melt the paint – which will be a pain to fix. If you’re painting a new wooden door, you only need to sand once using fine grade sandpaper.NOTE: Be sure to seek out a suitable sand paper for your UPVC doors. Same applies for your primer and final paint, since you’ll want to ensure they’re nicely adhesive.Fill in any gaps in wooden doors with wood filler
Using a putty knife, scoop enough wood filler into the gap to overfill it slightly. This will mound over the top of the gap, before hardening and shrinking to give a smooth, seamless finish. Sand smooth once the wood filler has dried.Use a primer to help the paint adhere better
This is a must for UPVC and composite doors. As well as helping the paint stick to the surface, primer smoothens out any discoloration from previous paint jobs. It also prevents moisture from soaking through the door. As a result, there’s less of a chance of the paint bubbling or flaking after you’ve applied it.How to paint your front door
Apply your paint using a roller
You can buy a roller fairly cheaply online or from your local DIY shop. It’ll help avoid any annoying brush marks and help with any detailing on the door.Leave for 24 hours before repainting
Phew, time to sit back and have a well-deserved rest while you wait for the paint to dry. How long you leave the door before applying your second coat depends on the temperature, but we’d advise giving it about 24 hours. Sand the door in between applying coats of paint
Glossy coats of paint show up minor imperfections in the underlying surface of the wood. To guarantee a super-smooth finish, apply a thin layer of paint, sand it down, apply another, clean up, and repeat. Use very fine wet-and-dry sandpaper with a grit of around 180 or higher. Before painting your next coat, don’t forget to clean away any dust using a damp sponge.Replace Your Old Handles
There’s more to repurposing doors and updating their look than just the paintwork. Why not replace your front door handles too? How to replace old door handles
Keeping your front door wedged open, use your screwdriver to loosen the screws holding the handle in place.When you remove the screws, both the outer handle and interior handle will slide out together. Keep hold of both handles as you remove them and do this slowly.Repeat the process in reverse order to install the new handle. As long as you’ve measured your old handle correctly, installing your new one should be easy.Once complete, lift the handle up and down to check it moves freely and that the door opens and closes correctly. You can also try locking and unlocking your door using your key.
Whatever handle you go for, you’ll want it to cover up any marks left by the previous fixing. This shouldn’t be a problem if you’ve already refinished the entire door (it’s why we recommend doing your front door renovations all in one go).If you’re replacing the latch as well as the handle, try to choose a replacement that’s slightly larger than the old one. This will help cover any gap that was motriced away to accommodate the previous latch.You’ll also want to match your spindle (the square rod or bar that connects two door handles together either side of the door) and backset (the distance from the edge of the door to the centre of the spindle) to the ones being replaced. Top tip: Make it easy for yourself by going for the same size and shape as the non-visible components that are being replaced.Update Your Hinges
Aside from your front door’s lock, one of its most important parts are the hinges. Durable and strong hinges not only support your front door, but they also keep you and your family safe from intruders and offer protection from the elements. When renovating front doors, it’s well worth checking if your hinges have come loose or are showing any signs of damage.Tips for updating your hinges
If your front door comes with three hinges, you can replace them one by one without having to remove the front door. Remember to shop for hinges that match the size of the ones you’re replacing, otherwise you’ll probably have to widen the mortice in order to accommodate the new ones.Since the topmost hinge carries most of the weight of the door, make sure the weight of the door is supported when you’re removing it. By transferring that weight onto the other hinges, you could damage them and the surrounding door frame.Before you secure your new hinges in place, check that they’re the right way up and are aligned with your existing screws. After your hinges are replaced, coat them in a protective lubricant to protect them against mechanical wear-and-tear and ensure you don’t have to replace them again for a good while.Relocate Your Door Numbers
We may be biased, but we think our solid brass front door hardware should be the only way to greet your guests. If your current house number, sign or plaque just isn’t your thing anymore, we suggest replacing it with our high quality and stylish options as part of your front door makeover. That’s exactly what Alicia at @emeraldterrace did. She was blown away by how some small, easy tweaks totally transformed the look of her front door – check out her reel here.Defined by a contrast of narrow and broad lines, our BANKS Brass Door Numbers look striking against monochrome or darker coloured doors. Our WHITMAN Contemporary Brass Door Numbers have neatly defined edges and an art deco aesthetic to complement your home’s unique personality. You can also get this set in a larger size, allowing you to have an even grander presence on your street – and be the envy of all your neighbours.Your house number isn’t a functional part of the front door, so it doesn’t actually need to be on there. At this stage of your front door restoration, you might decide to relocate your house number to the side of your house nearby (make sure it’s visible from the street). Just remember that once you do this, you’ll be left with a mark where the old door numbers were.
Use a strong adhesive, like Gorilla Glue, to apply our door numbers — no drilling required.
Choose A Decorative Door Knocker
We’re not out of front door renovation ideas just yet! Give your guests a classic way to announce their arrival and fully equip your entrance with our elegant door knockers. They have maximum impact when paired with our door numbers and are the perfect prelude to your knock-out home renovation.With its crisp lines and reflective finish, our SMITH Elongated Hex Door Knocker adds a contemporary twist to traditional front doors. Then there’s our sleek and sophisticated WILSON Door Knocker. Flaunting a multifaceted surface and satisfying texture, it’s guaranteed to please your guests when they call.Getting your door knocker up and running couldn’t be easier. Simply attach to your front door using the two bolts and striker plate supplied. Once the door knocker is in place, you can rely on its long-standing impact, as we cover all our solid brass hardware in a clear lacquer glaze to protect their surface, come rain or shine.Follow our steps like a pro and you’ll have a front door of dreams in no time. Try to get some before and after pictures along the way. Or, why not have a go at creating your own transformation reel on Instagram? We’d love to see it, so tag @plankhardware and use #PlankProjects.
Blog


Fit for pro skills…